-
Go back to 'WordPress' in our customer portal through your hosting package. There you'll find the details you need to log in.
-
Open a new tab in your browser and visit yourdomainname.be/wp-admin. This will take you to your website's login page.
-
Enter the username and password found in the customer portal.
- website
- web hosting
- create wordpress website
Create a website in WordPress?
A step-by-step guide for beginners
Nearly 40 percent of all websites on the web run on WordPress. It's not surprising that this content management system (CMS) is so popular. For people creating a website for the first time, WordPress is an easy-to-use system. Experienced web developers, on the other hand, find WordPress a tool with unlimited possibilities. In short, anyone can get started with WordPress.
Want to create a website in WordPress for the first time? We save you a lot of research with our guide below. In 10 steps and just a few hours of work, you'll have a professional website, ready for the world wide web.
Table of contents
Step 1: Register your own domain name
A domain name is the essential address of your WordPress website on the internet. It's what people type to visit your website, but also the web address that you put on business cards or even say in a video.
The choice of a domain name needs to be spot on from the start. Short, powerful, and easy to pronounce are the key features of a good domain name. Can't decide? Our extra tips for a good domain name might help. It helps you choose a domain name tailored to your goals.
Step 2: Choose a WordPress hosting package
In addition to an address, your website also needs space on the web. Our hosting packages are optimized for WordPress. This means easy management, fast performance, and strong security. At Nomeo, you can choose from two different WordPress hosting packages.
| WordPress web hosting performance | Managed WordPress web hosting | |
|---|---|---|
| Price | 1 year free€ 4.00/month | € 20.00/month |
| Automatic WordPress installation |  | |
| Web space | 2 GB | 25 GB |
| SSL certificate | | |
| Caching (Varnish, Redis) | | |
| Backups | 30 days | 90 days |
| Malware scans (via Patchman) | | |
| WordPress updates |  | |
| Security checks | | |
| Performance optimization | | |
| Uptime monitoring | | |
| Malware cleanup | | |
| 50 mailboxes | 50 mailboxes | |
| Free migration service | | |
| Order | Activate now | Contact us |
Step 3: Activate WordPress
Now that your domain name and hosting package are set, it's time to activate WordPress. We've made it easy for you to do so.
Once you've logged into the customer portal, follow these steps to activate WordPress:
-
In the overview, click on 'Web Hosting'.
-
Choose the hosting package where you want to activate WordPress.
-
Click on 'WordPress'.
-
Slide the switch to 'On' to activate WordPress.
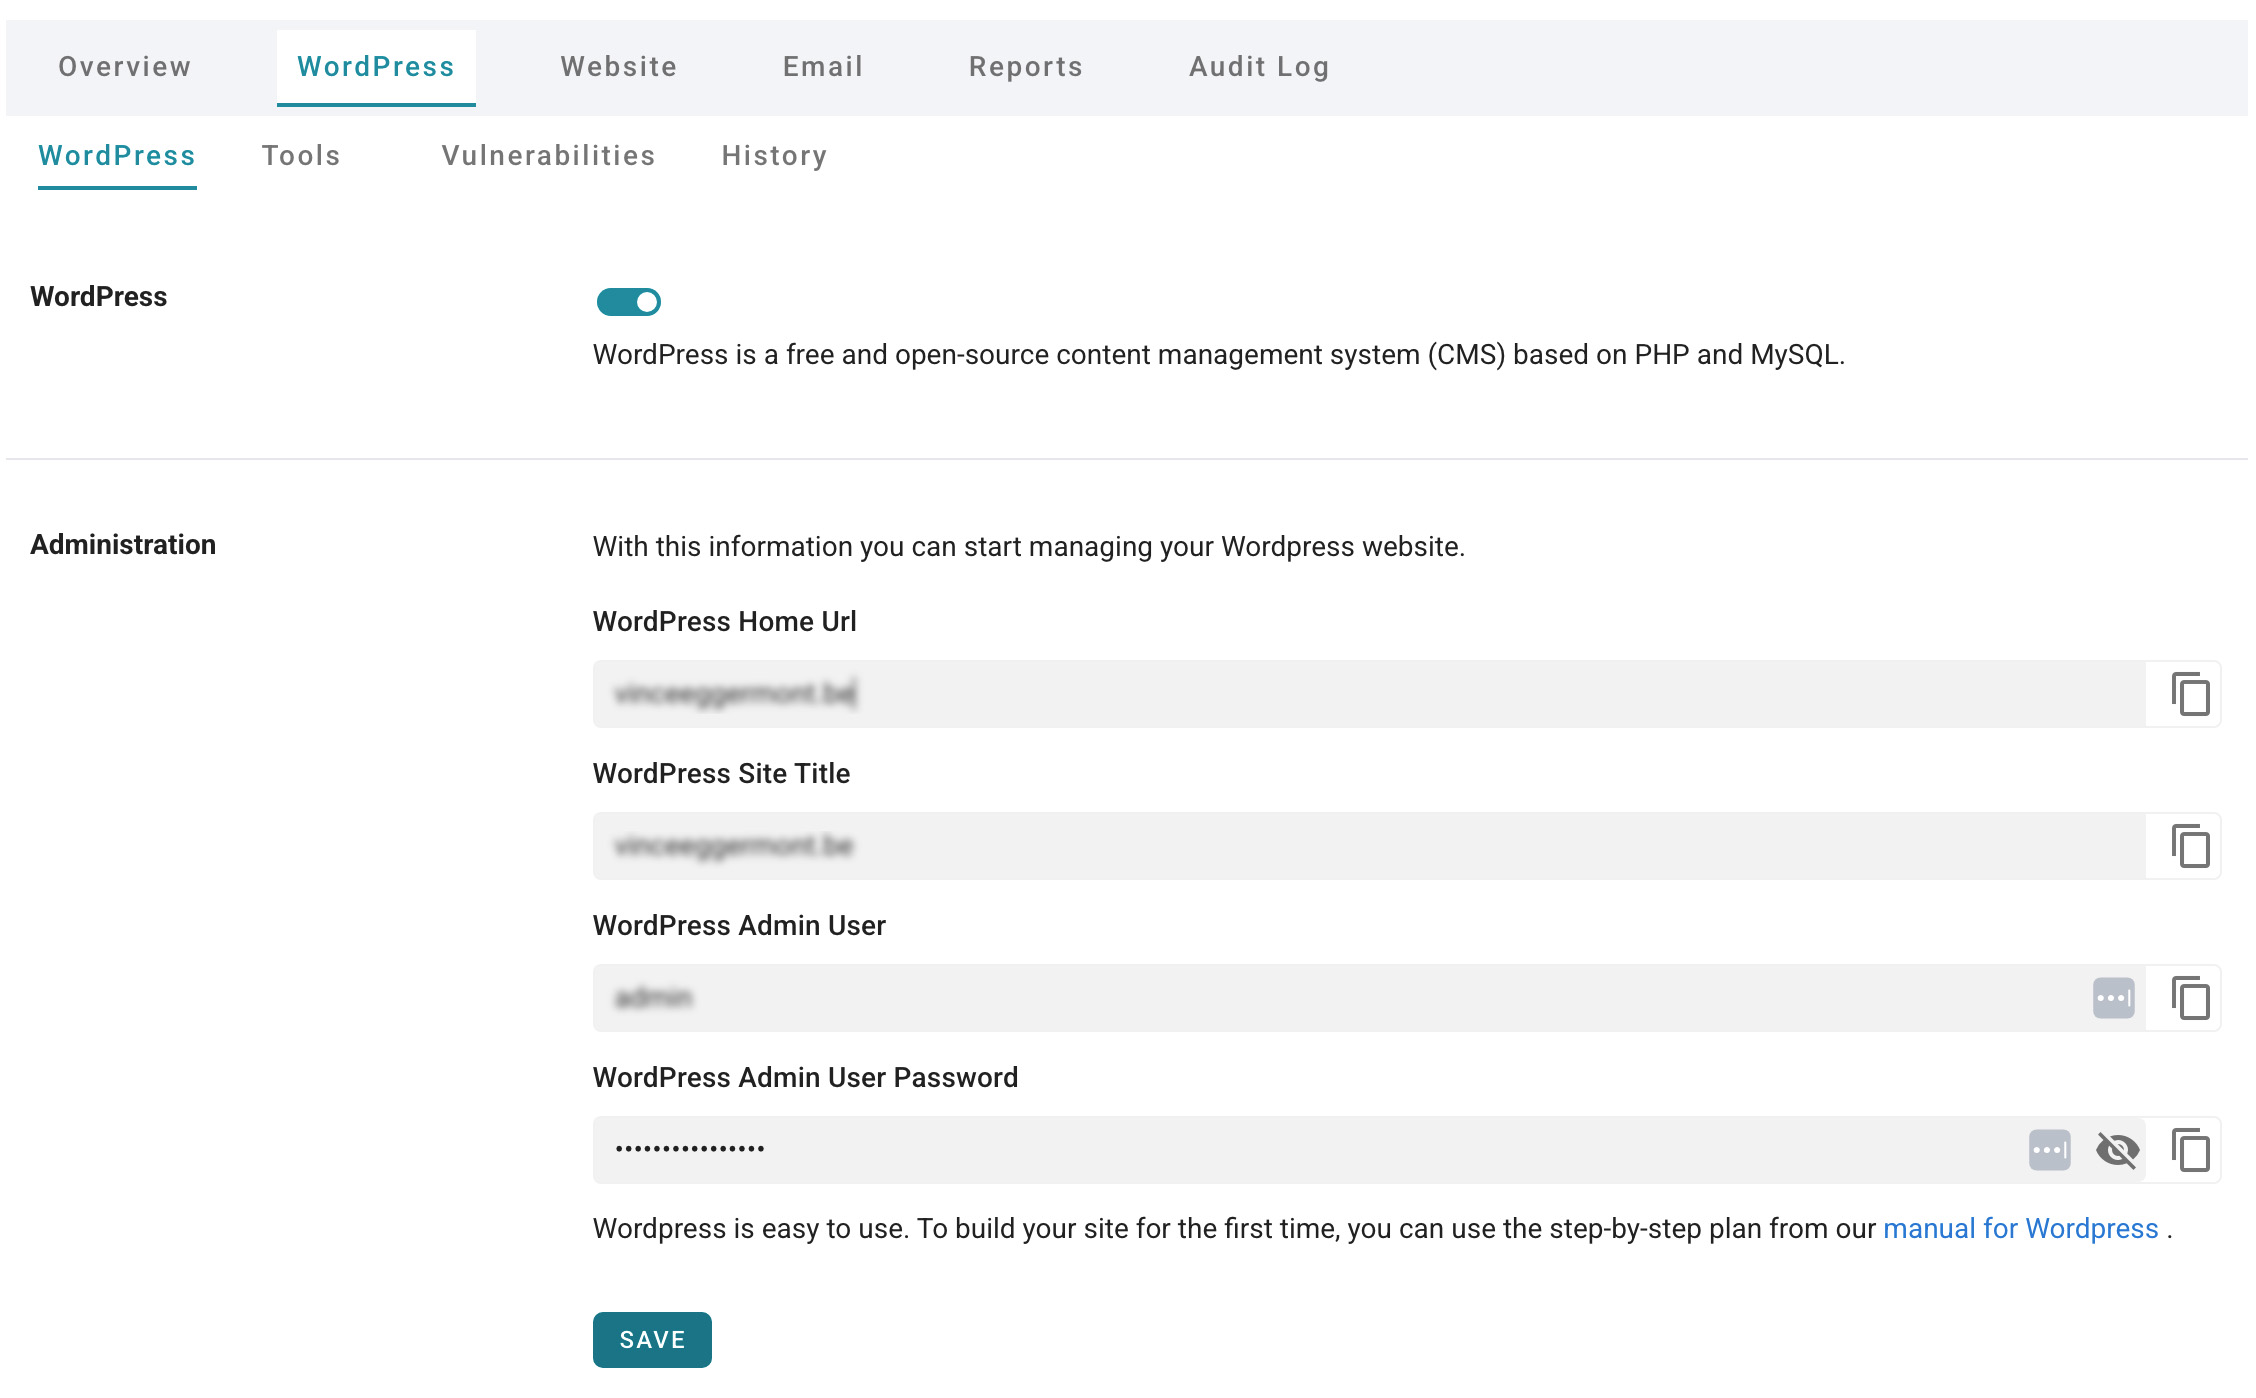
That's all you need to do to activate WordPress on your hosting package. Once WordPress is active, you'll see the login credentials you need to start working on your website.
Step 4: Log in to WordPress
It's almost time to start building your website. Before you can log into WordPress, you need to link your domain name to the web space. You can do this in our customer portal.
-
In the customer portal, again choose the web hosting package where you installed WordPress.
-
You will see the message that your domain name is not yet linked. Click on 'Set up your domain name for hosting'. You can also find this setting under the 'Website' tab, then 'Webserver'.
-
Click under 'A-record' on the 'Add' button to link your domain name to hosting.
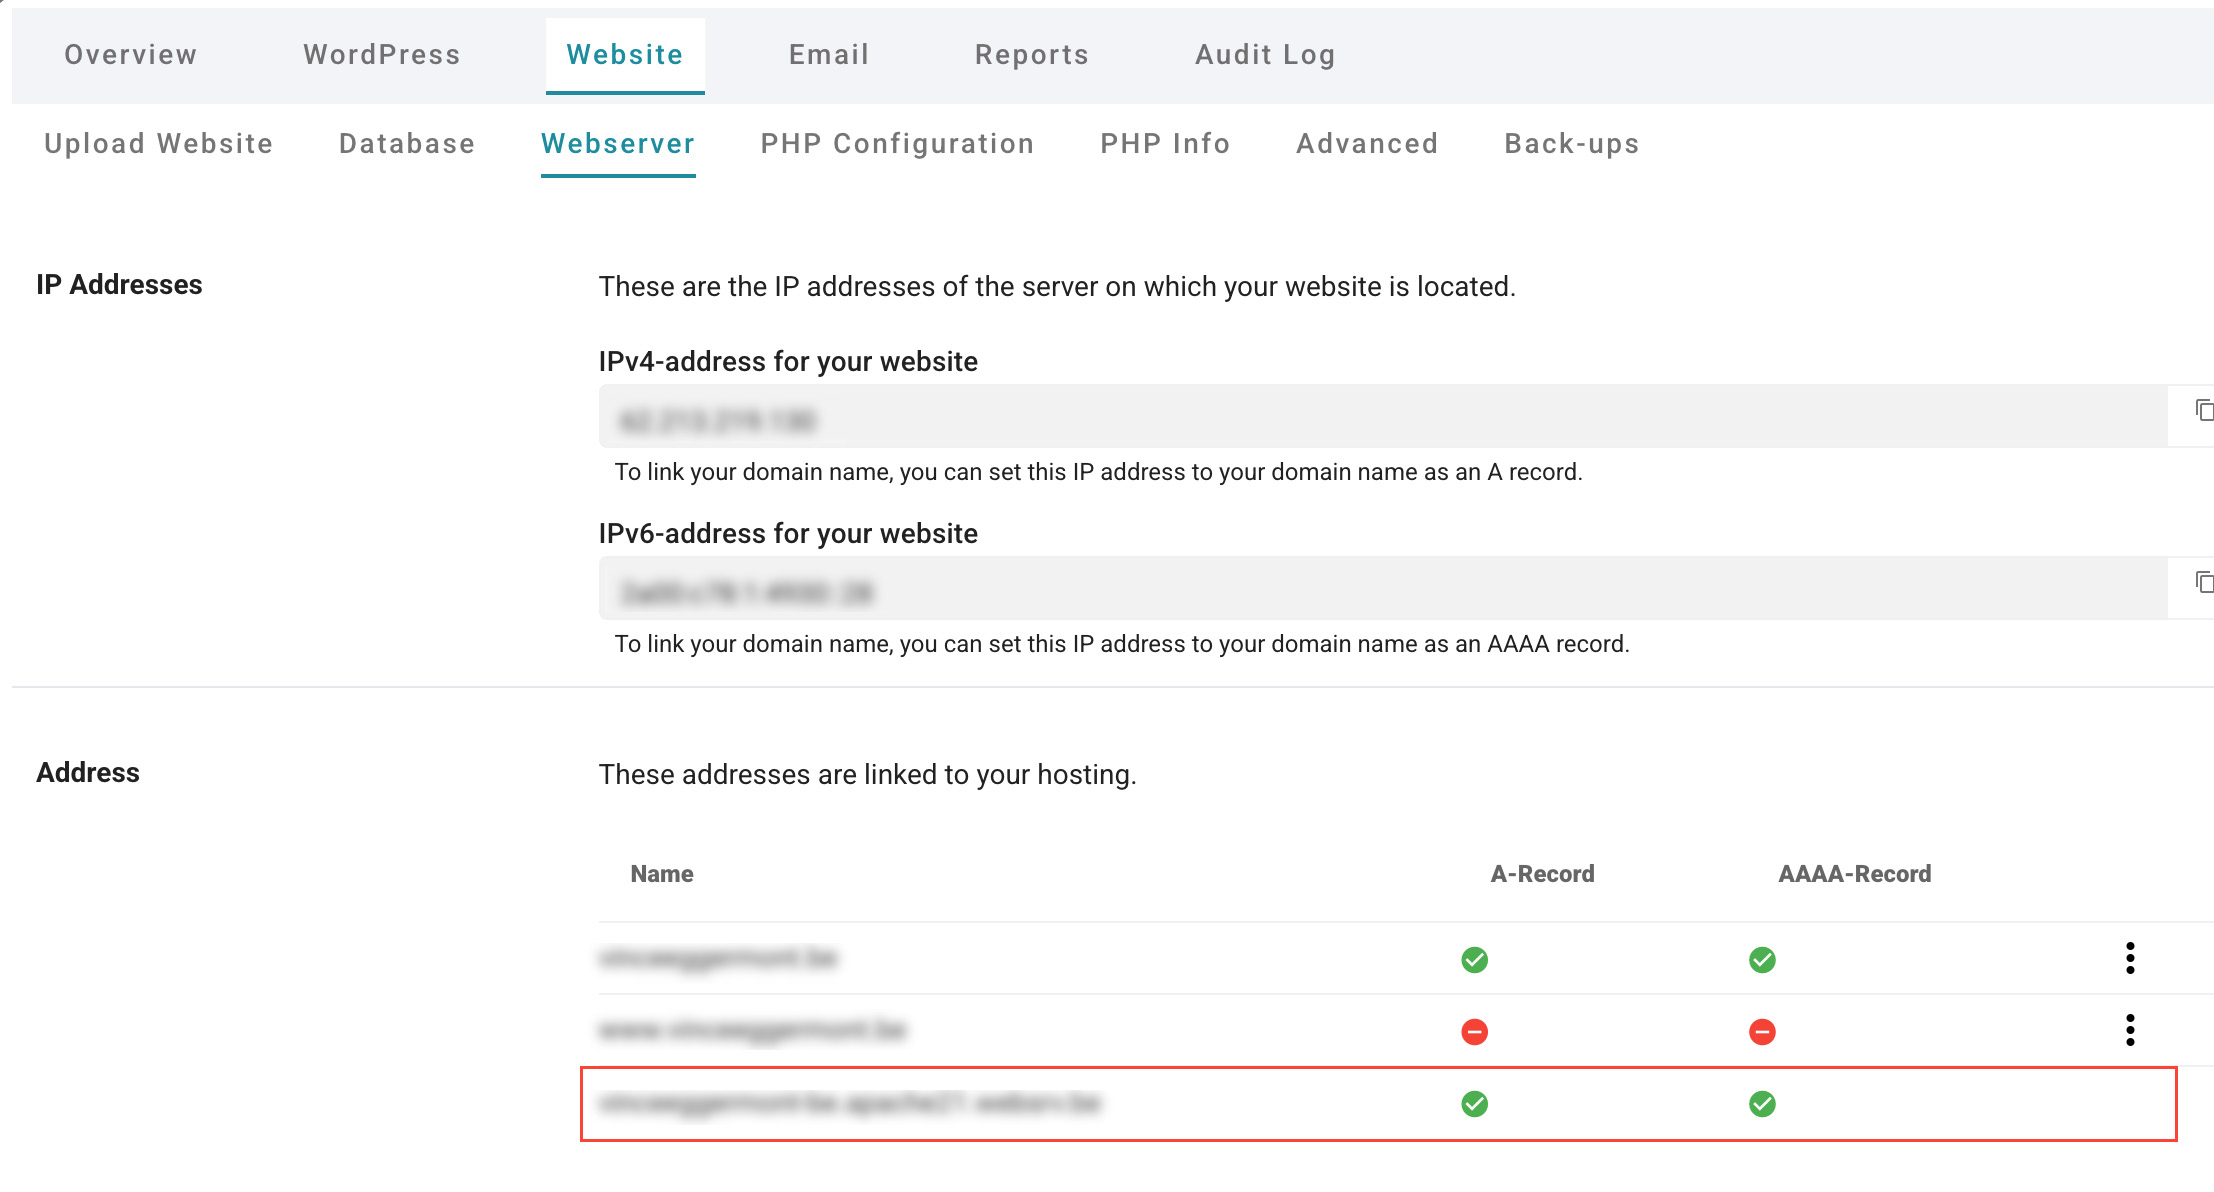
Now that your domain name and web hosting are linked, you can log in to WordPress to start building your website:
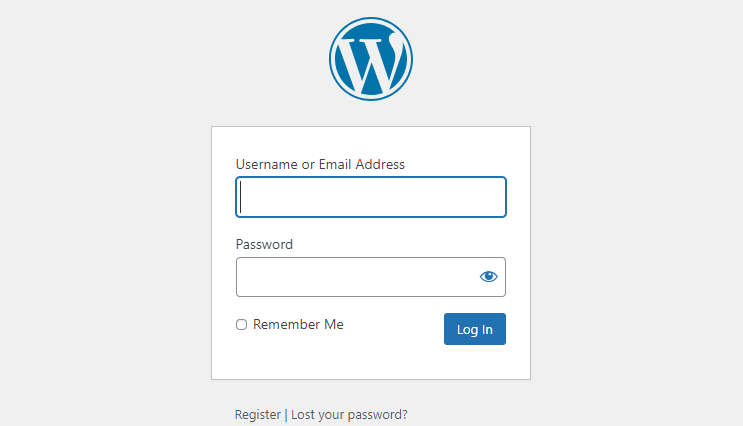
Tip: Getting an error when you try to access the login page? Sometimes it takes a while for the link between your domain name and web hosting to become active. Fortunately, you can use a temporary URL to get started.
In the 'Address' field, you'll see a URL ending with 'websrv.be' (see the image above). If you copy that and add '/wp-admin' at the end, you’ll also reach the login page. After a maximum of 60 minutes, you can use the regular URL to log in.
Step 5: Ensure a secure website
A secure https connection for your website is important. It protects the data visitors enter on your site, such as when they sign up. A secure connection is actually the standard on the web today.
Fortunately, you don’t need to do much. We automatically activate an SSL certificate from Let's Encrypt, ensuring a secure https connection. Just like the connection between your domain name and hosting, it may take up to 60 minutes for your SSL certificate to become active. You don’t need to do anything during this time.
In WordPress, you can go to 'Settings' and then 'General' to configure https correctly. On this page, you'll see 'WordPress Address' and 'Site Address'. If both URLs start with http, it’s best to change them to https.
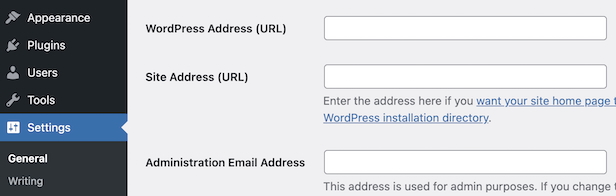
Tip: The plugin Really Simple SSL makes sure your website address and other URLs are converted to https. Thanks to this plugin, you don't have to do all that manually. It's very useful, especially when you've already added a lot of pages and/or images to your website.
Step 6: Get started with layout and functionality
When building a website in WordPress, there are three components that determine how your website looks: a theme, plugins, and widgets.
Choose a theme
Start by choosing a theme. A theme determines the layout of your entire website.
Once you're logged into WordPress, you can choose from several pre-installed themes or search for a theme you find more attractive. Many themes can also be installed for free on your website.
If the options seem overwhelming, you can filter by different categories. Be sure to choose a theme with good reviews and regular updates.
Once you’ve made your choice, clicking 'Install' is all you need to do to add the theme to your website.
Tip: Many themes come with photos, buttons, or other style elements that you can customize after installation. Don't be discouraged by these elements when a particular theme appeals to you. Later, you can replace or remove what you don't like.
Plugins: Functionality on your website
A plugin adds a specific feature to your website. Think of a contact form, a shopping cart, or a field where people can subscribe to your newsletter. How do you add a plugin to your website?
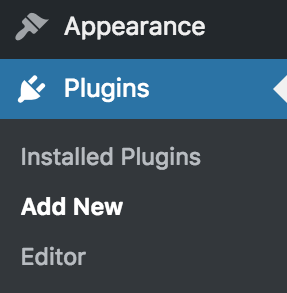
On the left side of the WordPress dashboard, you'll find 'Plugins'. Clicking on it will allow you to choose 'Add New Plugin'.
Through 'Add New Plugin', you can search for a specific plugin you want to add, or you can explore popular options via tabs like 'Featured' and 'Popular'.
Convinced by a plugin? Click the 'Install Now' button. However, we strongly recommend checking the rating, reviews, and compatibility before adding plugins.
Once the installation is complete, click 'Activate'. If you forget to activate a plugin, you can find installed but inactive plugins by going to 'Installed Plugins' on the left side.
Some plugins may require additional steps after installation. Others can be configured according to your preferences. To adjust the specific settings of a plugin, go to 'Installed Plugins' and click 'Settings' (or 'Settings') for a particular plugin.
Tip: If you've added plugins you're not entirely happy with, you can deactivate them via 'Installed Plugins'. If you no longer want to use a plugin, you can also delete it. This helps prevent having too many plugins and avoids security issues.
Widgets: Extras on your website
The third and final major building block of your WordPress website is widgets. These are specific elements you want to appear on certain pages or even everywhere on your website.
What exactly is a widget? A follow button for your social media, for example. A photo gallery on your homepage is another example. And a search function is also a widget.
The nice thing about widgets is that you can drag them around your website until they’re in just the place you want them. You can also put widgets in the left or right sidebar, or in the footer of your website. How do you add or adjust widgets?
On the left side of the WordPress dashboard, you’ll find 'Appearance'. Clicking on it will open the menu, where you'll see 'Widgets'.
You’ll now see an overview of all available widgets in the theme you chose. You can add widgets you’re interested in and place them at a specific location on your website.
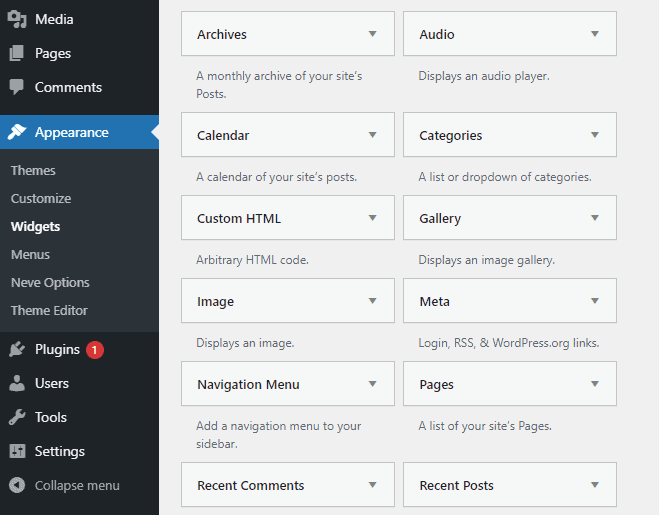
Tip: Widgets may differ from theme to theme. So it's possible that you’ll encounter different widgets when testing various themes at the beginning of your website.
Step 7: Add pages and posts
The theme, plugins, and various widgets determine how your website looks and which additional functionalities you want. You still need to add titles, text, and photos. This also applies to adding extra pages. We will explain that part first.
Adding a page in WordPress
Some themes come with a number of default pages, but you probably want to add extra pages to your website yourself. How do you create a new page?
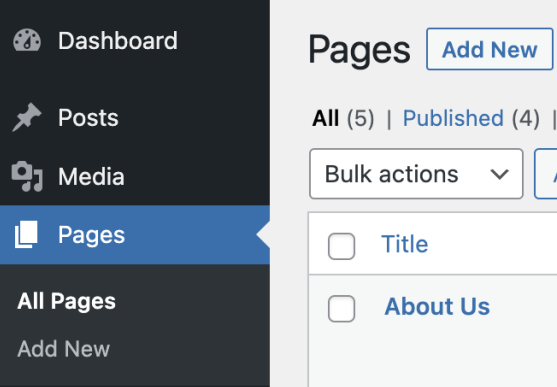
On the left side of the WordPress dashboard, you will find 'Pages'. There, you can choose 'All Pages' to see an overview of pages that already exist or select 'Add New'.
To add a new page, click on 'Add New'. You can immediately start with the title and content. Want to edit an existing page? Then click on that specific page in the overview.
Creating a new post in WordPress
Creating a new post can be compared to writing a new blog post. If you are building a website to blog, you will primarily use the posts feature to add new content. Here's how you do it:
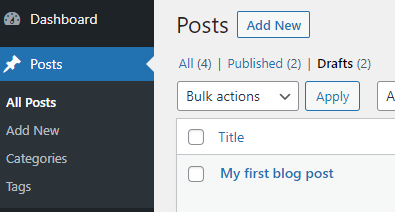
Again, on the left side of the dashboard, you will see 'Posts'. Click on it, and you can choose between 'All Posts' for an overview and 'Add New' for a new post.
To add a new post, click on 'Add New'. You can immediately start adding your new blog post.
Tip: If your website is a blog, you probably want visitors to see your latest posts right on the homepage. You can do this by clicking 'Settings', then 'Reading', and selecting the 'Your latest posts' option.
Adding a new category in WordPress
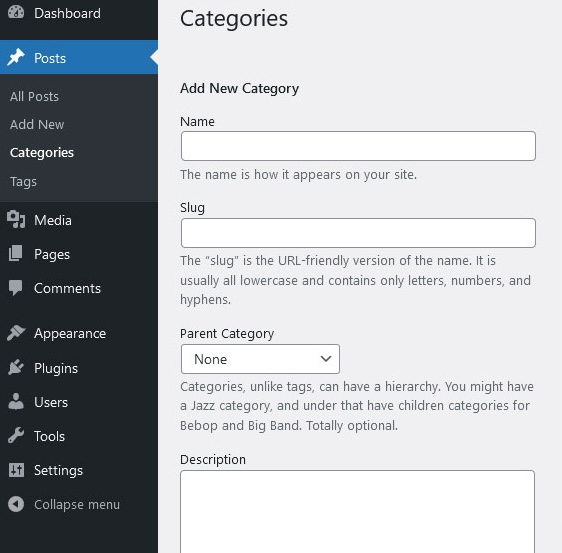
If you have many blog ideas that you want to organize into different categories, you can easily do this in WordPress.
On the left side of the dashboard, click on 'Posts'.
From the menu, select 'Categories'. On the left, you can add a new category, and on the right, you can see the existing categories.
Step 8: The header, footer, menu, and favicon in WordPress
After creating various pages, categories, and posts, you’ll also want to make sure people can easily find these pages on your website. It's time to work on the header, footer, and navigation menu.
Customizing the header in WordPress
Usually, your logo and the name of your company or blog are clearly visible in the header of your website. How do you add your name and image to your website?
In the WordPress dashboard, you will find 'Appearance'. Open that menu and choose 'Customizer'.
Once you open the Customizer, you’ll have a variety of options to adjust your website. In this case, you should go to 'Header'.
Under 'Header', you can now upload a logo and adjust its size.
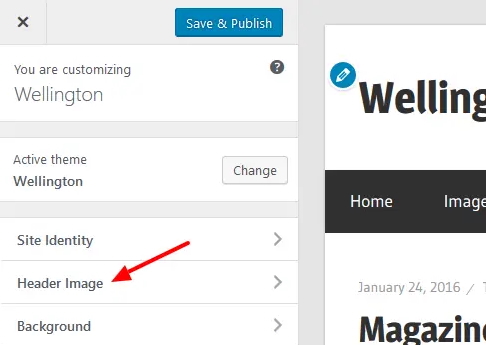
The Customizer in WordPress shows various default options to edit your website. However, these options can vary depending on the theme you have chosen.
Creating and adding a menu in WordPress
A navigation menu is useful for visitors to quickly navigate from one page to another on your website. How do you add this in WordPress?
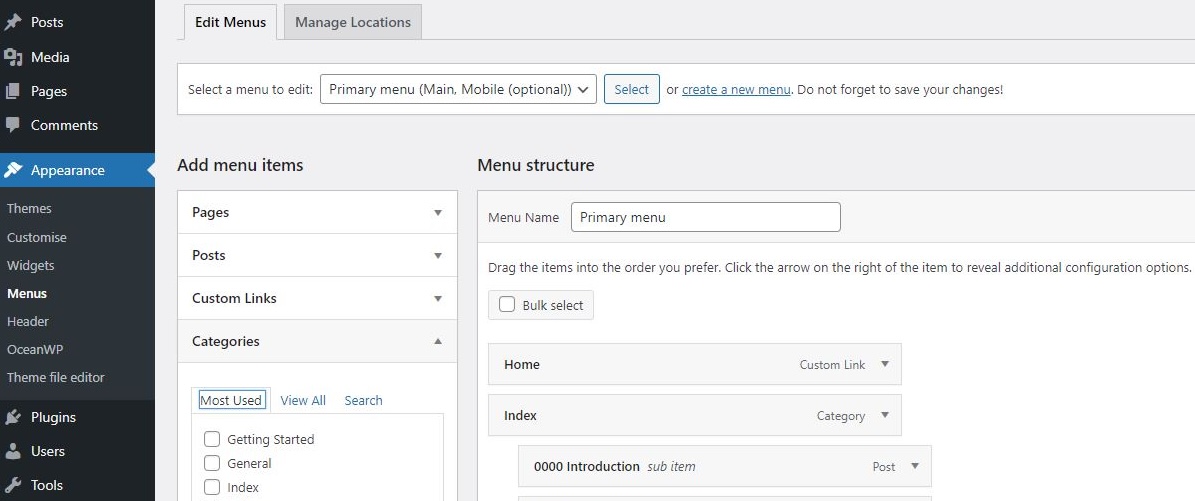
Under 'Appearance' on the left side of the dashboard, you will find the option 'Menus' to create a navigation menu.
Create a new menu and give it a name. For a menu that you want to place in your header, for example, you can name it 'Main Menu'.
Once your menu is created, you can check off pages, categories, and posts to add them to your menu.
Once you've added all the necessary items but are not happy with the order? You can rearrange them by dragging the items to the place you want.
The last thing you need to do is select a location for your menu. The options depend on the theme you have chosen. 'Main Menu' or 'Top Menu' will place it at the top of your website.
Adding or customizing a footer in WordPress
You can customize the footer of your website with a logo, a short description, extra widgets like a search function, or an overview of all important pages on your website. To modify your footer, follow these steps:
Under 'Appearance' in the dashboard, click on 'Widgets'.
On the right, you’ll find one or more boxes to adjust your footer. The number of boxes depends on the theme you've chosen.
Then, drag and drop the widgets into the footer section where you want to add them. These could be images, a tag cloud, a menu, or other elements.
Tip: You can make more visual adjustments via the Customizer in WordPress. Search for 'Footer' in the list to adjust the width of your columns or add your logo at the bottom of your website.
Adding a favicon in WordPress
A favicon is a small icon that appears in a browser tab next to the title of a website. It’s an important icon, as we are used to seeing it when we visit a website, and it adds extra recognition. Here's how to add a favicon:
-
Under 'Appearance' on the left side, open the Customizer again.
In the list of customization options, click on 'Site Identity'.
There, you can upload a favicon and, if you wish, also change the title of your website.
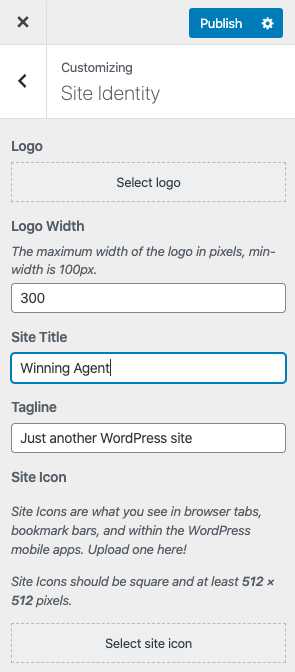
Tip: A favicon must meet a few guidelines. Make sure the image is square and 512 x 512 pixels in size. If you have a round logo, you can choose a transparent background to upload a square image that looks good in browsers.
Step 9: Adding images in WordPress
The pages and posts on your website can also use images or videos. Do you have lots of photos, illustrations, or infographics ready? You can upload them via 'Media'.
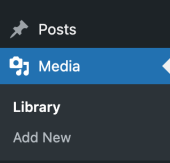
On the left side of the WordPress dashboard, you will find 'Media'. Click on it, and you can choose between 'Library' and 'Add New'.
Through 'Add New', you can upload one or more photos to the library. The 'Library' itself gives you an overview of the media files you've already added.
If you want to change the title, alternate description, or caption of an image, go to the media library and click on the photo you want to edit.
Every time you add a new page or post, you can add an image on the right side via 'Featured Image'. You can choose from images you've already uploaded or upload a new media file to use.
Step 10: Useful extras for your website in WordPress
A website is never 100 percent complete. Luckily, adding extra functionality to your WordPress website is easy thanks to the hundreds of available plugins and widgets. We’ve listed various tips that can help you get even more out of your website.
Your own email address
If you have your own domain name, you can also create one (or more) email address(es) to send emails. Such an email address is much more professional than a free one, especially when communicating with customers or partners.
But perhaps you also want to launch a newsletter in the future. Or you may want to respond to emails left by readers on your blogs. If you're working with other people on a website, they can all use an email address as well.
Creating your own email address
Creating an email address and mailbox on your own domain is very simple. Are you already logged into our customer portal? Then you can follow these steps.
Click on the 'Active Domain Names' tab and choose the domain name on which you want to create a mailbox.
Navigate to the 'Mail' tab.
Under 'Mailbox,' click on the 'Add New' button. Enter the address you want to use for emailing. Give your mailbox a name and a strong password. If you prefer to generate a password, you can click the icon next to the input field.
Are you satisfied with the email address you've chosen? Click 'Save' to add your mailbox.
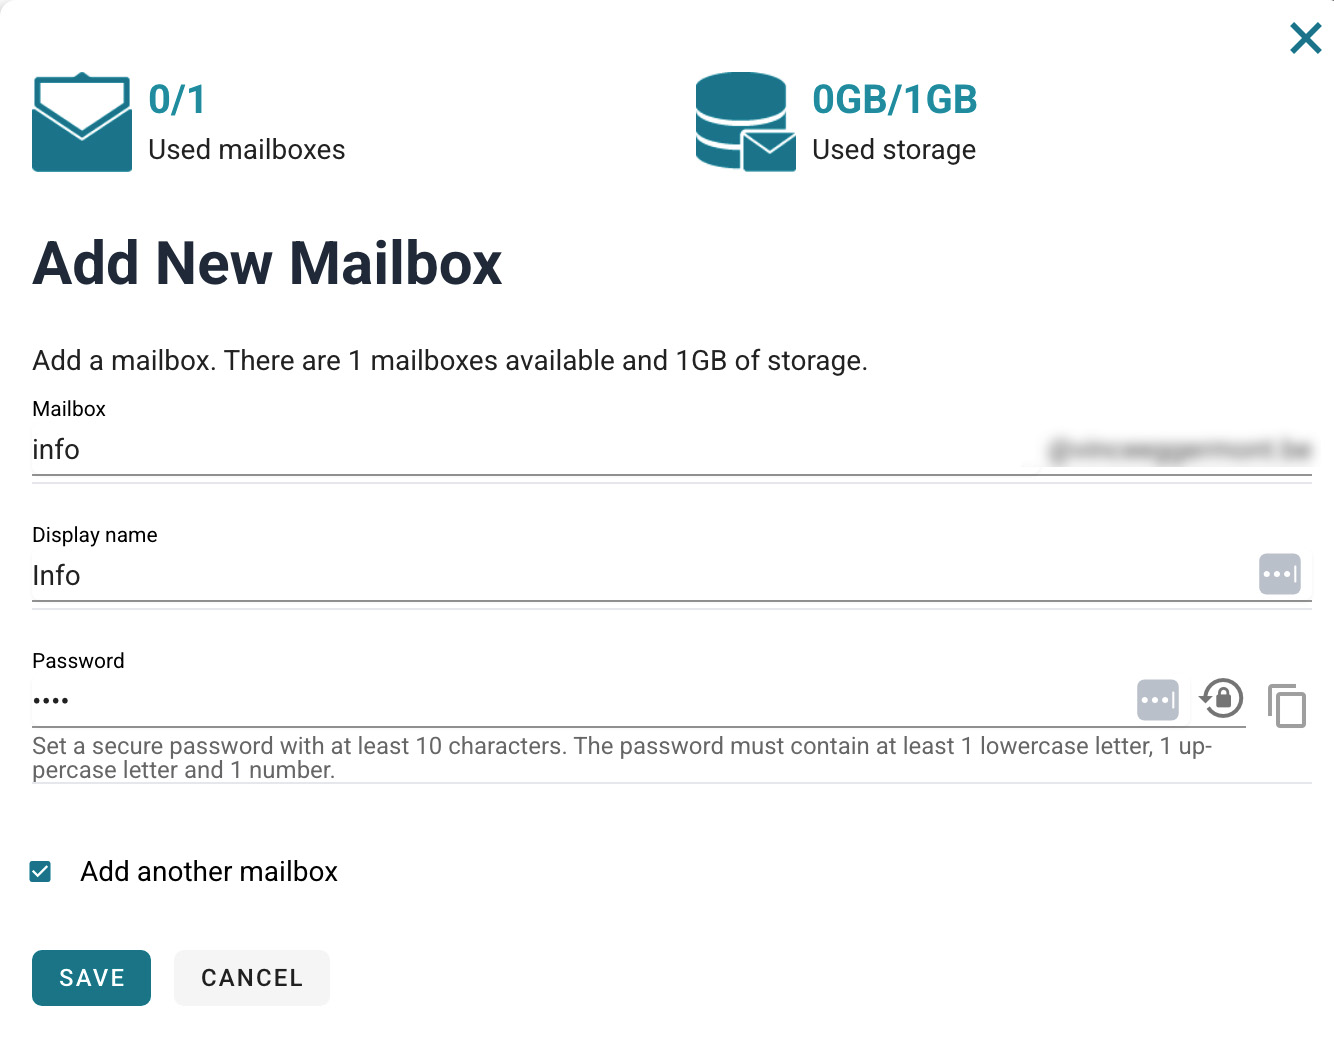
After saving your mailbox, it will automatically be linked to your domain name. We also ensure an SPF record and DKIM record are set up to protect you from email spoofing.
Do you want to create a mailbox for your colleagues? Or create a mailbox for different departments of your business? With our WordPress hosting packages, you get 50 email addresses and mailboxes to provide everyone with their own professional email address.
The most important plugins for WordPress
Plugins are small pieces of software that you add to your WordPress website. They provide extra functionality without you needing to dive under the hood of your website. How to add plugins is explained in step 6 of our guide.
That extra functionality is helpful, but often, you only need a small number of plugins. The most important ones are listed here for you.
Contact Form 7. A contact form is one of the most desired and used features on any website. And Contact Form 7 is the best plugin for that. Once you've activated the plugin, you need to set up which information you want to ask visitors and where you want the form to appear. Once you're done, you need to set up reCAPTCHA to avoid spam emails.
Askimet. Comments are a great way to create interaction between you and your visitors. But you don’t want to be overwhelmed by tens or even hundreds of spam comments linking to unwanted websites. Askimet is a plugin that's installed by default on WordPress and filters all comments. You just need to activate the plugin. A popular alternative is WordPress Zero Spam.
GDPR Cookie Consent. Since GDPR (privacy regulations), a cookie banner is more or less mandatory. If you collect visitor statistics, show YouTube videos, or link social media to your website, you can't do without it. GDPR Cookie Consent provides a cookie banner on your website, allowing visitors to decide which cookies they want to allow or not. With over 1 million installations, GDPR Cookie Consent is clearly one of the best plugins.
Can you install too many plugins?
The number of plugins you install can affect the performance of your website. In general, it’s best to limit the number of plugins to those you actually use. Inactive plugins or plugins you no longer need should be removed.
Is there a limit to the number of plugins before your website starts to load slower? Not really. The quality of the plugins you use is the most important criterion. If you choose reliable plugins that are regularly updated, the chances of your website becoming slow or insecure are small. Equally important: regularly update plugins to protect your website against vulnerabilities.
If you keep in mind to choose reliable plugins, update them regularly, and clean up inactive plugins, you really don’t need to limit the number of plugins.
Tip: Did you know that you can automatically update WordPress, themes, and plugins via our control panel? If you go to the web hosting package and then click on 'WordPress,' you can enable or disable automatic updates for even more convenience.
Step 11: Create fantastic content
Now that the layout of your website is complete, all the important pages are created, and several plugins provide extra functionality, it’s time to add content.
News posts, blogs, or guides help you attract more and new visitors to your website. Good content is always written with your visitors in mind. You want to offer them as much relevant information as possible to help them.
New content doesn’t immediately bring in a flood of visitors. Publish new posts regularly and occasionally surprise them with an original infographic or video. When you regularly publish new blogs, visitors will start to see you as an expert. This not only positively impacts your visitor numbers but also strengthens your audience's trust in your business.
Rank in search engines for more visitors
Your blog posts need to be found, of course. You can optimize new content for search engines. This is called Search Engine Optimization, or SEO for short.
The higher you rank in search results, the more visitors you'll get to your website. Along with good content, SEO ensures more, sustainable, and high-quality traffic to your website.
Yoast: SEO plugin for WordPress
Yoast SEO is a free plugin that allows you to optimize your website for search engines. The plugin works for new blogs, but you can also improve your homepage, contact page, or product page with Yoast. How exactly does the plugin help you?
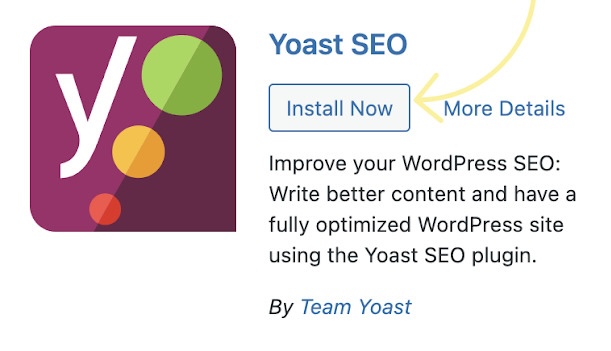
Manage which pages and posts are displayed in search engines and how they appear.
Optimize pages and blogs based on the most important keywords for those pages.
Automatically generate a sitemap for search engines.
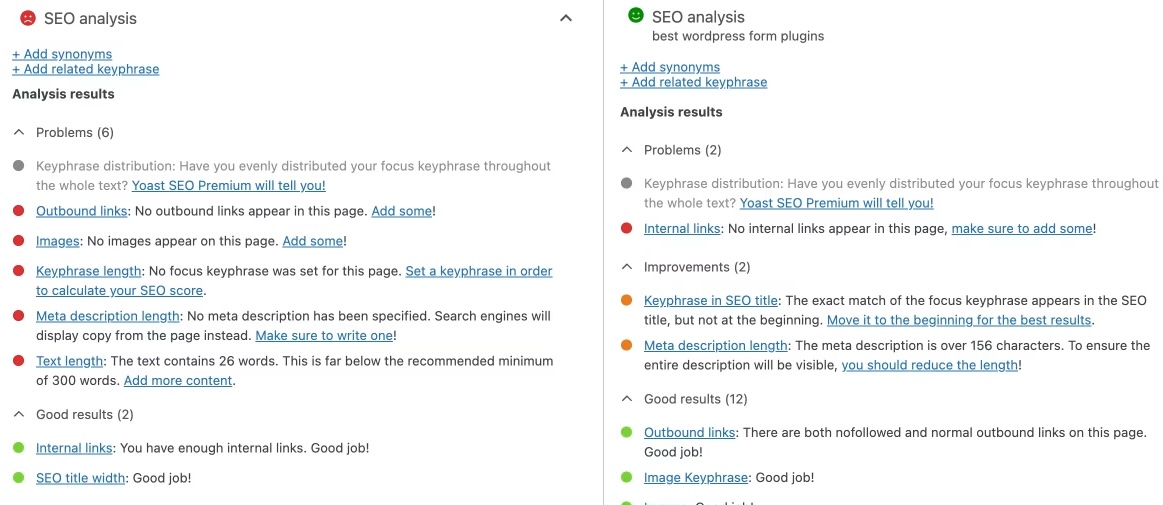
Yoast gives you control over what search engines see on your website. You can fill in page titles and descriptions that will then be shown in Google.
What's handy is that Yoast clearly tells you where and how to optimize your pages. The plugin scans your page for keywords and then shows you which steps you can take to improve the content. Yoast SEO is, in short, the plugin for every beginner who wants to optimize a website to appear at the top of Google search results.
Start your WordPress website right now
A new domain name and WordPress hosting are all you need to start your new website. Within a few hours, you will have a professional website ready to be filled with top content.
However, don’t expect instant success. Once your website is ready, you'll need to publish new content regularly to attract (new) visitors. And you’ll also need to defend that coveted top spot in Google by regularly reviewing and optimizing your website. Build your website's success step by step.
Did our guide help you well? Let us know through Facebook or Twitter.
Need help?
Feel free to contact us.